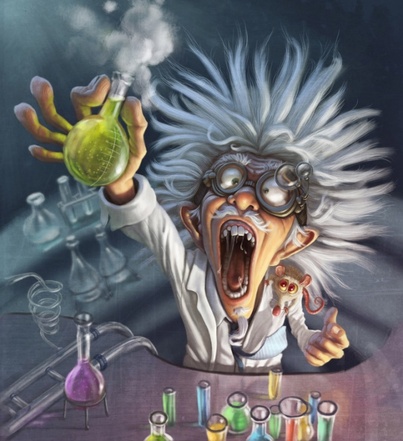
Fizz, Boom, Pop!
Science really comes to life when children have a chance to get their hands dirty and conduct dynamic experiments. If you're not a science expert, don't worry -- the programs in this chapter will help you create a welcoming environment for scientific exploration, fun, and laughter.
Science really comes to life when children have a chance to get their hands dirty and conduct dynamic experiments. If you're not a science expert, don't worry -- the programs in this chapter will help you create a welcoming environment for scientific exploration, fun, and laughter.
Let it Snow!
Video: The Science of a Blizzard (From R U Curious? chapter 3)
If you have access to a projector, show this video, which has a quick overview of blizzard science, history, and safety tips. And as long as you have the projector out, you can go here to use an Interactive Weather Maker. Have kids suggest conditions they think will cause the most intense snow and wind. Experiment and see what happens!
Craft: Blizzard Garlands (From R U Curious? chapter 3)
Make fold-and-cut paper snowflakes. Go here to figure out the proper way to fold your paper to make accurate six-sided flakes. Use light weight paper (like origami paper) in wintery colors like silver, white, blue, and purple. Tape the snowflakes along 3-4 foot lengths of thin paper ribbon or yarn. When several children have their garlands finished, have them hold them in from of a table fan. Turn on the fan and watch the blizzard go! You can also use this opportunity to talk to the children about how there are no two snowflakes that are exactly alike!
Other Ideas
*Ice Painting
*Erupting Snow
*Instasnow
*DIY Instasnow
*Ice Excavating
*Ice Boat Regatta
Splish Splash Science
Does it Float? (pg 120)
You may remember this from the Early Literacy Water/Hydrology chapter. This is basically the same activity, with more discussion. I'm going to give you options to amp it up even more!
What You Need
What You Do
Snack and Craft: Orange Wedge Boats
What You Need
What You Do
Does it Float? (pg 120)
You may remember this from the Early Literacy Water/Hydrology chapter. This is basically the same activity, with more discussion. I'm going to give you options to amp it up even more!
What You Need
- Several buckets, storage tubs, deep bowls, etc (Depending on how you do this, you will need up to 4 containers per group of kids. If your items are small, you can use tall, clear cups.)
- Water
- *Clear Soda
- *Glycerin or vegetable oil
- *Salt water
- Paper bags filled with objects to test (paper clips, marbles, grapes, erasers, rocks, toothpicks, rubber balls, small toys, etc.)
- Plastic spoons
- Paper to record their findings (there should be a worksheet provided in the manual)
- Pencils or crayons
- Plastic Plates
What You Do
- Children will predict whether certain objects will sink or float in water. If you choose to use other media, they will also need to predict if certain objects will sink or float in these liquids and how each medium will differ. They will then find out if their hypotheses are correct through experimentation.
- Demonstrate the process by first pulling an item from a paper bag (I would make yours something the kids don't have), talking about what you think the outcome will be, writing the name of the object or drawing a picture of it on the left hand side of your sheet, and placing it gently in the water.
- Watch to see whether it sinks or floats, and mark the appropriate column on the recording sheet. Remove the item using a plastic spoon and place it on a plastic plate. (This is where all the wet objects will go.)
- You may then place it in the soda, salt water, and glycerin, if you're doing that portion of the program. Repeat as indicated above. You will need to augment the recording sheet, or make a new one if you would like to expand this program in this way, as the one provided will not feature these liquids.
- Give each group of children (4-5 kids) a recording sheet, pencils or crayons, and a bag of items. If the group is fairly young, guide the group through the experiment, telling them which object to choose and which liquid to use, prompting each step of the process. If they are more independent, allow them to work at their own speed, selecting objects in any order.
- After the children have finished testing all the objects (in all the liquids), gather together and discuss the findings. If you have a white board, use it to record the findings, so the group may see. Which objects floated? What do those objects have in common? Which objects sank? Do those objects have commonalities? Which liquid was the easiest to float in? Why?
Snack and Craft: Orange Wedge Boats
What You Need
- White card stock cut into right triangles (1 per child)
- Toothpicks (1 per child)
- Oranges cut into quarters (1 per child)
- Crayons or markers
- Clear adhesive tape
What You Do
- Children decorate their paper triangles like ship sails, using crayons or markers. Encourage them to create any design they'd like.
- Tape a toothpick onto one side of each sail, leaving approximately half the toothpick sticking out.
- Insert the end of the toothpick into an orange wedge. The fruit becomes the boat and the paper becomes the sail.
- Enjoy! (I recommend augmenting this with a more substantial snack, as one orange wedge isn't going to cut it! At least not with my kids!)
- As a group, try floating one completed orange boat in the liquids you used for "Does it Float?" Be sure to ask for predictions!

Float Your Boat: Boat Building Challenge (pg 125)
What You Need
What You Do
What You Need
- A large bowl, bucket, sink, or wading pool, 3/4 full of water
- Building materials (ie: disposable dishes and flatware, plastic bags, balloons, straws, plastic jars with lids, fabric, CD cases, rubber bands, skewers, corks, paper, Styrofoam trays (like from the meat department, craft sticks, etc.)
- A variety of types of adhesive tape and glue
- Quarters or washers
- Small prize
What You Do
- Work in pairs or in small groups to build boats using any of the materials provided.
- When teams are finished, attempt to float them in the water.
- Find out which boat will support the most weight by adding quarters or washers one at a time.
- Award prizes to the team whose structure supported the greatest weight before sinking.
Activity: Ocean in a Bottle (pg 121)
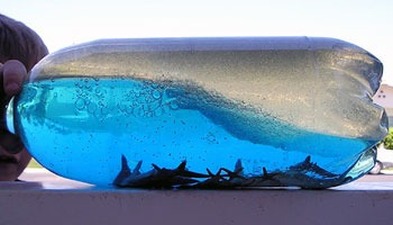
Using oil and water, you can make an ocean in a bottle! Instructions can be found here, as well as in the manual. The manual does not advocate the addition of glitter, but I think it's pretty! I also think you could just add a small boat, instead of sea creatures. And I think the bottle in the picture has too much water in it. More oil than water makes the colored waves easier to see.
Using oil and water, you can make an ocean in a bottle! Instructions can be found here, as well as in the manual. The manual does not advocate the addition of glitter, but I think it's pretty! I also think you could just add a small boat, instead of sea creatures. And I think the bottle in the picture has too much water in it. More oil than water makes the colored waves easier to see.
Ocean-themed Crafts From the Web
*Paper Plate Jellyfish
*Goldfish Kites
*Paper Whale
*Paper Bowl Jellyfish
*Another Paper Bowl Jellyfish
*Toilet Paper Tube Octopus
*Jellyfish in a Bottle
*Paper Plate Jellyfish
*Goldfish Kites
*Paper Whale
*Paper Bowl Jellyfish
*Another Paper Bowl Jellyfish
*Toilet Paper Tube Octopus
*Jellyfish in a Bottle
Fizz! Pop! Science
Gloop! (p. 123)
In this experiment, participants will create "Gloop," a mixture that can't be clearly identified as a solid or a liquid. It's a little bit of both! This project can get messy, so consider laying out newspapers or tarps, or working outside. Gloop has a unique viscosity (how easily a liquid flows), and is known as a "non-Newtonian fluid." The viscosity of non-Newtonian fluids can be changed by applying different types of pressure.
There is a recipe in the manual, but I also found several online that differed slightly in ratios of ingredients. Make sure you test your recipe before you hold this program, because I've done this before where the recipe I had didn't work and we had to improvise on the fly. You can do this in small batches and just let the kids stick their fingers in and smack it and play around, or you can do a pool full and run and hop over it!
Demonstration: Liquid Launch (pg 124)
Be sure to hold this program outdoors and tell participants to stand back!
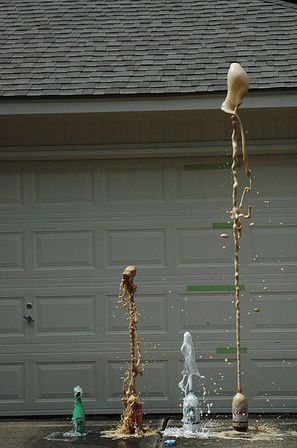
This program is best done with Diet Coke and Mint Mentos. If you're feeling adventurous, you can buy several kinds of soda and see which one shoots highest. Have the kids guess which one they think will shoot the highest. The image to the left indicates how much better Diet Coke works than other forms of soda. Its also much less sticky!
If you are worried about getting messy, purchase a Geyser Tube from the Steve Spangler website. Here is the science behind why this works.
You can also purchase this kit on the Steve Spangler website to turn your vertical geyser into a rocket car!
Be sure to hold this program outdoors and tell participants to stand back!
This program is best done with Diet Coke and Mint Mentos. If you're feeling adventurous, you can buy several kinds of soda and see which one shoots highest. Have the kids guess which one they think will shoot the highest. The image to the left indicates how much better Diet Coke works than other forms of soda. Its also much less sticky!
If you are worried about getting messy, purchase a Geyser Tube from the Steve Spangler website. Here is the science behind why this works.
You can also purchase this kit on the Steve Spangler website to turn your vertical geyser into a rocket car!
